DIY Projects Finished So Far With Instructions and Pictures!
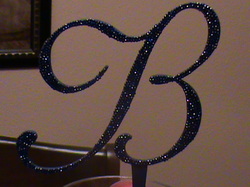
Cake Topper- DONE!
1. To make my cake topper I started by contacting Crafty Eddy at [email protected]. I sent him my monogram and he then cut my B out for me and had a picture of the final product in like 24 hours. He was super fast! The single letter cost $14 dollars.
2. Next, I painted it in a navy acrylic paint that I found at Michaels for like a dollar. The brand of paint was Craft Smart. I painted 2 coats of paint.
3. After it dried I then started slowly gluing dark blue rhinestones on. I ordered the rhinestones on ebay from Hotfix Rhinestones. I ended up using all of the first 720 I ordered and needed more so I would suggest getting 2 just in case because shipping does take awhile (so it was like 10 bucks for all the rhinestones, but I have extra that I will use for invites).
4. To glue them on I used E600 glue. I would put a little squirt on a plastic spoon and then would use a toothpick to cover a very small area with a thin layer of glue.
5. After the glue was on I used tweezers to put the rhinestones on. It took a LONG time, but you just have to be patient and go slow.
Total the project cost me about 27 dollars! Not too shabby!
Boarding Pass Invitations- DONE!!!! See pics under All Things Paper!
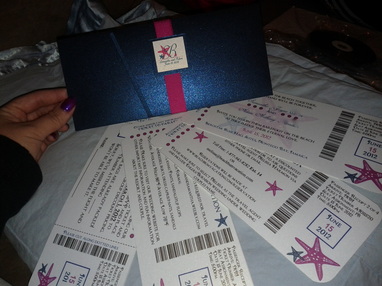
These instructions were made for me by the amazing Knottie venus909 and they helped me tremendously! Modified slightly to what I did.
Here is how I made the ticket portion:
Using the template located here: http://www.ayleebits.com/templates.htm
The template is fitted for a regular letter size sheet of paper and holds three tickets.
I added the text and design to the ticket as I wanted. I did the first three tickets on one page and then I did the RSVP ticket on another page.
After I completed my design I printed them all on the cardstock I purchased. I printed them at home on my HP printer that is a pretty good quality printer. It took a long time, but was so worth it.
After they were printed I used a paper cutter to cut them to the ticket size. (I already owned one, so I didn’t need to purchase it, and I can’t find the one I have online, but you don’t need something fancy… something like this would work: http://www.archiversannex.com/Mini-Rotary-Disk-Paper-Trimmer-85--DPT100/default.aspx?PageID=21&CategoryID=16&ProductID=35912&SPG=2&ItemID=72983&RootCatCode=11250 I’ve also heard if you print them at Kinko’s they will cut them for you if you asked them.)
After they were all cut at the straight lines, I used a corner rounder to round out the corners on the right side of the ticket. You can buy a corner rounder at Michael's or any store that has scrape booking stuff.
I then used sharp pointy scissors to cut the “V’s” in the indented portion of the ticket and to round the other corners. This was probably the hardest part of the whole project. The scissors that venus909 used are called cutterbee’s: http://www.archiversannex.com/Cutter-Bee-Scissors-Original-EKCB01/default.aspx?PageID=21&CategoryID=16&ProductID=20200&ItemID=46017&RootCatCode=11250 . I used little nail scissors to cut mine out because I already had them. You can use any scissors, but I like these because they seem to be the perfect size to handle and they are super pointy and sharp. I cut the V part first and then used the scissors to round it out a bit.
That is all that is needed to do for each ticket portion. It takes a really, really, really long time! Don't underestimate how long it takes to do this step, especially when you have to do a large amount like I did.
For the Folders/envelopes:
I used the template located here for each envelope: http://www.ayleebits.com/templates.htm
I printed the sheets from MS Word onto each sheet of card stock. The cardstock I got was from Paper and More: http://www.paperandmore.com/metallic_paper_dark_blue_80.htmlThis paper was really thick and would not go through my home printer like the cardstock I used for the invitation portion (which was 62lb I think) so I had to use my work printer and manually feed the paper for each of the sleeves. So keep that in mind because you might have to take them to kinkos.
I then used an exacto knife (this is the knife I used: http://www.michaels.com/Martha-Stewart-Crafts%E2%84%A2-Utility-Bone-Folder/ms0489,default,pd.html?cgid=products-scrapbooking-marthastewartcrafts-tools& , I got this one because it was an all in one tool and the bone folder is needed for the folding) and a metal ruler to cut the excess paper on the solid lines and make the slit on each envelope. To help protect the surface and help make cleaner cuts I used a cutting mat. I already owned one that was ordered through creative memories, but this one would work perfect: http://www.archiversannex.com/Cutter-Bee-Self-Healing-Mat-13X13-EKCB16/default.aspx?PageID=21&CategoryID=16&ProductID=18014&ItemID=40047&RootCatCode=11250
Once each folder/envelope was cut I used the bone folder and metal ruler to score each envelope on the dotted lines. By scoring the paper on the dotted lines, the folding will be easier and cleaner. I would not skip this step.
After each sheet was scored, I would fold them using the bone folder
Then use adhesive on the long side and the bottom to secure them closed. This is the adhesive I used and recommend: http://www.archiversannex.com/Mono-Adhesive-Dots-Dispenser-Permanent-1/3X39ft-62147/default.aspx?PageID=21&CategoryID=39&ProductID=18053&PPG=6&RootCatCode=11700
If you get the above adhesive, you only need to buy one dispenser and then you can get the refills. Also, make sure the one you get is the permanent one because they do sell it in non-permanent.
For the outside decoration:
I designed my own logo and printed them out through photoshop to fit 1 inch squares. I matted them onto 1 ¼ inch blue squares. I used a layering tool to makes sure they were even and centered.
Instead of using the layering tool, you can use a c-thru ruler (you can then also use this ruler in place of the metal ruler) http://www.dickblick.com/products/c-thru-grid-ruler/ What you would do it stick the 1 inch square to the colored cardstock and then measure and cut ¼ inch all the way around using the ruler and exacto knife.
You could just cut the 1 ¼ inch squares and center the 1 inch squares yourself.
I then cut the ribbon in 8.5 inch strips. I wrapped them around each envelope and secured them with the same adhesive used for the envelope. I used adhesive dots to secure the logo pieces on top of the ribbon. These are the dots I used in Medium size: http://www.archiversannex.com/Zots-Clear-Adhesive-Dots-37/default.aspx?PageID=21&CategoryID=39&ProductID=14990&RootCatCode=11700
To glue the squares onto the ribbon I used a hot glue gun because it seemed to give the best hold.
Assembly:
After all the pieces were completed, I finished the assembly by putting the ticket into each envelope.
The envelopes I got were from Paper and More. The outside envelope was a #10 Dark Blue Metallic Envelopes and my RSVP envelopes were 4 Bar Pink Azalea which fit perfectly in the #10 envelope.
It sounds a lot more complicated than it really is. And it is definitely worth the effort.
If any step is not clear, PLEASE feel free to reach out to me and I will try to explain it a bit differently.
Good Luck and Have Fun!
DIY To Do List
- Postcard Save the Dates- DONE!!!! See pics under All Things Paper!
- Starfish Magnets
- Welcome Letter for OOT Bags
- Coloring/Activity Book for Kids OOT Bags
- Photo Share Cards
- Itinerary/Timeline for OOT Bags
- Starfish Escort Cards
- Table Numbers
- Guest Book
- Program Fans
- Team Bride Tank Tops (possibly...)
